How to mount Novell network drives
One of the major requirements for running Ubuntu at work is that I need to be able to access our department network drives on Novell Netware servers. I thought this was going to be a difficult procedure, but as you will soon learn it is not hard at all.
Novell Netware servers use the NCP protocol to provide network shares. Therefore, an NCP client is needed to connect to these network drives. The NCP client for Linux is called "ncpfs", which is available in the Universe repository for Ubuntu. Here are the steps it takes to access your Novell network drives.
Enable the "Universe" repository
Create a directory that will become the network drive
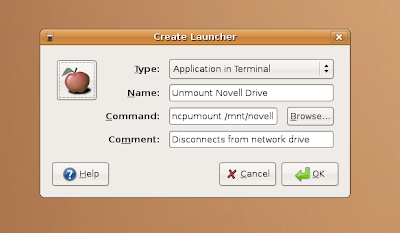
Create a desktop launcher to unmount the drive
When you are done, you should have two icons that look something like this:
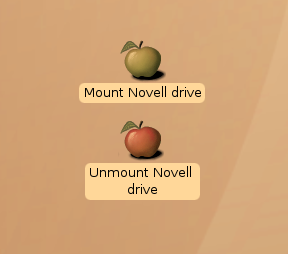 To mount the drive, simply double-click on the green apple (GO) and a terminal will open up and ask you for your password. Once you have typed the password and hit "Enter", the network drive will be mounted. To unmount the drive, simply double-click the red apple (STOP).
Note: I have posted these instructions to the Ubuntu Wiki.
Credit: I got some of this information from this post by Todd Slater.
Novell Netware servers use the NCP protocol to provide network shares. Therefore, an NCP client is needed to connect to these network drives. The NCP client for Linux is called "ncpfs", which is available in the Universe repository for Ubuntu. Here are the steps it takes to access your Novell network drives.
Enable the "Universe" repository
- Click on "System>Administration>Software Sources"
- Check this box: "Community maintained Open Source (universe)"
- Click on "Close" and let the system update the software catalog
- Click on "System>Administration>Synaptic Package Manager"
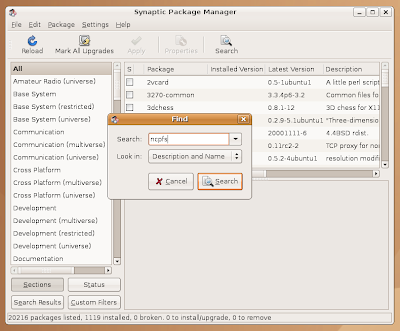
- Search for "ncpfs"
- Choose to install "ncpfs"
- Click on "Apply" and allow it to install any required dependencies

Create a directory that will become the network drive
- Create a new directory called "novell"
- Click on: "Applications>Accessories>Terminal"
- Run this command: "sudo mkdir /mnt/novell"
- Change permissions so that your user can access it
- Run this command: "sudo chown yourusername:yourusername /mnt/novell"
- Be sure to use your actual username on the Linux system
- Create a link so the folder will be available on your desktop
- Run this command: "ln -s /mnt/novell/ /home/yourusername/Desktop/novell"
- Be sure to use your actual username on the Linux system
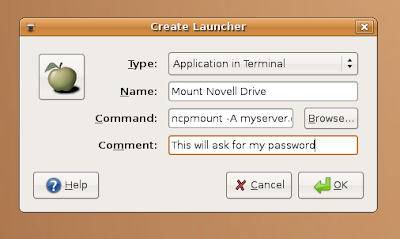
- Right-click on the desktop and choose "Create launcher"
- Click on "Icon" and choose the picture of the green apple. (Green is for GO)
- Click on the "Command" tab and select "Application in terminal"
- Paste this command into the field labeled "Command"
- ncpmount -S yourservername -A yourservernamefqdn -U novellusername -V volumename -u linuxusername /mnt/novell/
- (Be sure to edit each of the fields with your information)

Create a desktop launcher to unmount the drive
- Right-click on the desktop and choose "Create launcher"
- Click on "Icon" and choose the picture of the red apple. (Red is for STOP)
- Click on the "Command" tab and select "Application in terminal"
- Paste this command into the field labeled "Command"
- ncpumount /mnt/novell/

When you are done, you should have two icons that look something like this:
Note: I have posted these instructions to the Ubuntu Wiki.
Credit: I got some of this information from this post by Todd Slater.

Bravo! I particularly love the fact that you took the extra trouble to add the pictures and add this gem to the Ubuntu wiki knowledge bank. I can hardly wait to try this out. :-)
ReplyDeleteExcellent - very clear instructions and worked perfectly. Many thanks
ReplyDeletewhy not try the following?
ReplyDeleteinstall ncpfs, and ipx
apt-get install ncpfs
apt-get install ipx
sudo mount -t ncpfs [server]/[novel_username] [mount_point]
UMMM Because maybe your just not using ipx?? Because maybe you didn't give up on Netware after version 3.11?
ReplyDeleteThis works and attempts to login to the server as the current linux user (username) -- just change the values with [] around them (and remove the [])
ReplyDeleteYou could also set variables like $NWSERVER and things on user login... if you wanted to automate it a bit more.
ncpmount -S [yourservername] -A [serveraddress] -U $USERNAME -V [volume] -u $USERNAME [mount directory]
Good JOb! :)
ReplyDeleteYes ! That works so nice :)
ReplyDeletethe command i use is :
without -v option, so it mounts all my volumes.
Great !
It worked for me by using -b switch for Bindery login. I've Netware 4.11 with sp10 (= Netware 4.12) with only ipx protocol i.e., no ip support.
ReplyDeletencpmount -S -U -P -u -b /mnt/novell
This format worked for me:
ReplyDeletencpmount -S server -A server.domain.name -U username.office.department.company -V FOLDERNAME -P ******* /mnt/novell/